In late 2022, Astronomer held a hack week. During that hack week, my team worked tirelessly to develop a new OSS package called Astronomer Cosmos. As the repository description suggests, it allows you to run your dbt core projects as Apache Airflow DAGs and Task Groups with a few lines of code. Since its launch last year, the repository has gained much traction in the Open Source Community. The #airflow-dbt channel in the Airflow OSS Slack is buzzing with threads on properly using Cosmos, and rightfully so, as Cosmos allows you to avoid massive charges from using dbt Cloud if you are willing to host your dbt core project in Apache Airflow.
This project currently holds an Apache License 2.0, which allows non-Astronomer Airflow users to use it. I do want to note that running Airflow (and Cosmos) on Astronomer’s platform is the “Rolls Royce” experience of running Airflow. Honestly, MWAA is more like the “Honda Accord” experience. Despite this, I recently needed to run Cosmos on MWAA at my new job. This blog post will aid you in the same endeavor and help you avoid the same pitfalls I faced.
Prerequisites
Before continuing, you’ll need to ensure that you have git & Docker Desktop configured on your local system.
Getting Started
To emulate an MWAA environment locally, let’s use AWS’s very own aws-mwaa-local-runner. This repository contains a comprehensive README instructing how to run MWAA locally with just a few commands.
Step 1 - Clone aws-mwaa-local-runner
To get started, let’s clone that repository to our local system:
git clone git@github.com:aws/aws-mwaa-local-runner.git
Currently, Airflow version 2.6.3 is the latest available version on MWAA, so that’s what I’m using in this example. However, since we will install dbt core in a Python virtual environment, dependencies between dbt and Airflow should be isolated, allowing you to run Cosmos with various versions of Airflow.
Before we spin up Airflow, let’s make some changes to some files.
Step 2 - Create a venv for dbt
The first change we need to make is to initialize a virtual environment as part of the MWAA startup script. We are going to install our dbt core adapter here. Please note that in this blog, I’m using dbt-postgres, but you can use whichever adapter you’d like (i.e., dbt-snowflake, dbt-bigquery, etc.). It is important to note that the SQL in this project may need to be modified to work properly with other adapters.
./startup_script/startup.sh
#!/bin/sh

set -e

export DBT_VENV_PATH="${AIRFLOW_HOME}/dbt_venv"
export PIP_USER=false
python3 -m venv "${DBT_VENV_PATH}"
${DBT_VENV_PATH}/bin/pip install dbt-postgres==1.6.3

export PIP_USER=true
This Virtual Environment will help to isolate common dependencies between Airflow & dbt, as previously mentioned so that you don’t end up in Dependency Hell.
Step 3 - Add Cosmos to project requirements.txt
Next, let’s add Cosmos to the actual project requirements:
./requirements/requirements.txt
--constraint "https://raw.githubusercontent.com/apache/airflow/constraints-2.6.3/constraints-3.10.txt"

# these two depedencies were already in the project
apache-airflow-providers-snowflake==4.2.0
apache-airflow-providers-mysql==5.1.1

# we are adding astronomer-cosmos here
astronomer-cosmos==1.1.1
Step 4 - Create a dbt project
Now that we’ve set up the framework to install Cosmos, let’s add a dbt project. I will utilize dbt’s classic project example, Jaffle Shop, for this blog. This project is their Hello World example of how to run dbt.
Run the following commands from your terminal to embed the Jaffle Shop project into the MWAA Local Runner project.
aws-mwaa-local-runner git:(2.6.3) $ mkdir dags/dbt && cd dags/dbt # make a /dbt sub-directory within your /dags directory
dbt git:(2.6.3) $ git clone git@github.com:dbt-labs/jaffle_shop.git # clone the jaffle shop project to that /dbt directory
dags git:(2.6.3) $ cd ../.. # go back to the project home
At this point, ou should have a project that structure like:
.
├── CODE_OF_CONDUCT.md
├── CONTRIBUTING.md
├── LICENSE
├── README.md
├── VERSION
├── dags
│   ├── dbt
│   │   └── jaffle_shop
│   │       ├── LICENSE
│   │       ├── README.md
│   │       ├── dbt_project.yml
│   │       ├── etc
│   │       │   ├── dbdiagram_definition.txt
│   │       │   └── jaffle_shop_erd.png
│   │       ├── models
│   │       │   ├── customers.sql
│   │       │   ├── docs.md
│   │       │   ├── orders.sql
│   │       │   ├── overview.md
│   │       │   ├── schema.yml
│   │       │   └── staging
│   │       │       ├── schema.yml
│   │       │       ├── stg_customers.sql
│   │       │       ├── stg_orders.sql
│   │       │       └── stg_payments.sql
│   │       └── seeds
│   │           ├── raw_customers.csv
│   │           ├── raw_orders.csv
│   │           └── raw_payments.csv
│   └── example_dag_with_taskflow_api.py
├── docker
├── mwaa-local-env
├── requirements
│   └── requirements.txt
└── startup_script
    └── startup.sh
Step 5 - Add a DAG to run the dbt project
Now that we’ve installed cosmos and embedded a dbt project, we can add a DAG to parse the dbt project in Airflow. To do this, create a Python file in your /dags directory called /dags/my_dbt_dag.py. Here is a command for ease of creation:
aws-mwaa-local-runner git:(2.6.3) $ touch ./dags/my_dbt_dag.py
In that file, add the following code:
"""
## My dbt dag

We use this DAG to transform idms data for reporting. DAG is scheduled to run hourly
"""
import os

from airflow import DAG
from cosmos import DbtTaskGroup, ExecutionConfig, ProfileConfig, ProjectConfig
from cosmos.profiles.postgres.user_pass import PostgresUserPasswordProfileMapping
from datetime import datetime

airflow_home = os.getenv("AIRFLOW_HOME", "/usr/local/airflow")
dbt_path = f"{airflow_home}/dags/dbt/jaffle_shop"
dbt_executable_path = f"{airflow_home}/dbt_venv/bin/dbt"

with DAG(
    dag_id="my_dbt_dag",
    start_date=datetime(2023, 9, 23),
    schedule=None,
    doc_md=__doc__,
    catchup=False,
    tags=["dbt", "postgres"],
):

    DbtTaskGroup(
        project_config=ProjectConfig(dbt_project_path=dbt_path),
        execution_config=ExecutionConfig(dbt_executable_path=dbt_executable_path),
        profile_config=ProfileConfig(
            profile_name="airflow_db",
            target_name="cosmos_target",
            profile_mapping=PostgresUserPasswordProfileMapping(
                conn_id="postgres_default", profile_args={"dbname": "airflow", "schema": "jaffle_shop"}
            ),
        ),
    )
Step 5 - Fix Local DB
For some reason, MWAA Local Runner doesn’t expose the Postgres port (which we will need to see the results of our dbt runs), so update the docker-compose file to do so:
./docker/docker-compose-local.yml
version: '3.7'

networks:
    airflow:
        driver: bridge

services:
    postgres:
        image: postgres:10-alpine
        networks:
            - airflow
        environment:
            - POSTGRES_USER=airflow
            - POSTGRES_PASSWORD=airflow
            - POSTGRES_DB=airflow
        logging:
            options:
                max-size: 10m
                max-file: "3"
        volumes:
            - "${PWD}/db-data:/var/lib/postgresql/data"
        ports:
            - "5432:5432"

    local-runner:
        image: amazon/mwaa-local:2_6
        networks:
            - airflow
        restart: always
        depends_on:
            - postgres
        environment:
            - LOAD_EX=n
            - EXECUTOR=Local
        logging:
            options:
                max-size: 10m
                max-file: "3"
        volumes:
            - "${PWD}/dags:/usr/local/airflow/dags"
            - "${PWD}/plugins:/usr/local/airflow/plugins"
            - "${PWD}/requirements:/usr/local/airflow/requirements"
            - "${PWD}/startup_script:/usr/local/airflow/startup"
        ports:
            - "8080:8080"
        command: local-runner
        healthcheck:
            test: ["CMD-SHELL", "[ -f /usr/local/airflow/airflow-webserver.pid ]"]
            interval: 30s
            timeout: 30s
            retries: 3
        env_file:
            - ./config/.env.localrunner
Step 6 - Fire up the environment
Everything is in place for us to spin up Airflow. Let’s do so by running the shell command provided to us by AWS (FYI, this process can take a few minutes)
Build the Environmnet
./mwaa-local-env build-image
Start Airflow
Login to Webserver
Navigate to http://localhost:8080 in your web browser. If you are prompted for a Username & Password, then use the default from AWS which is:
- Login:
admin
- Password:
test
If you’ve followed these steps correctly, you should see a dag called my_dbt_dag in the DAGs list! Open it, and you’ll find the Jaffle Shop project rendered as an Airflow Task Group!
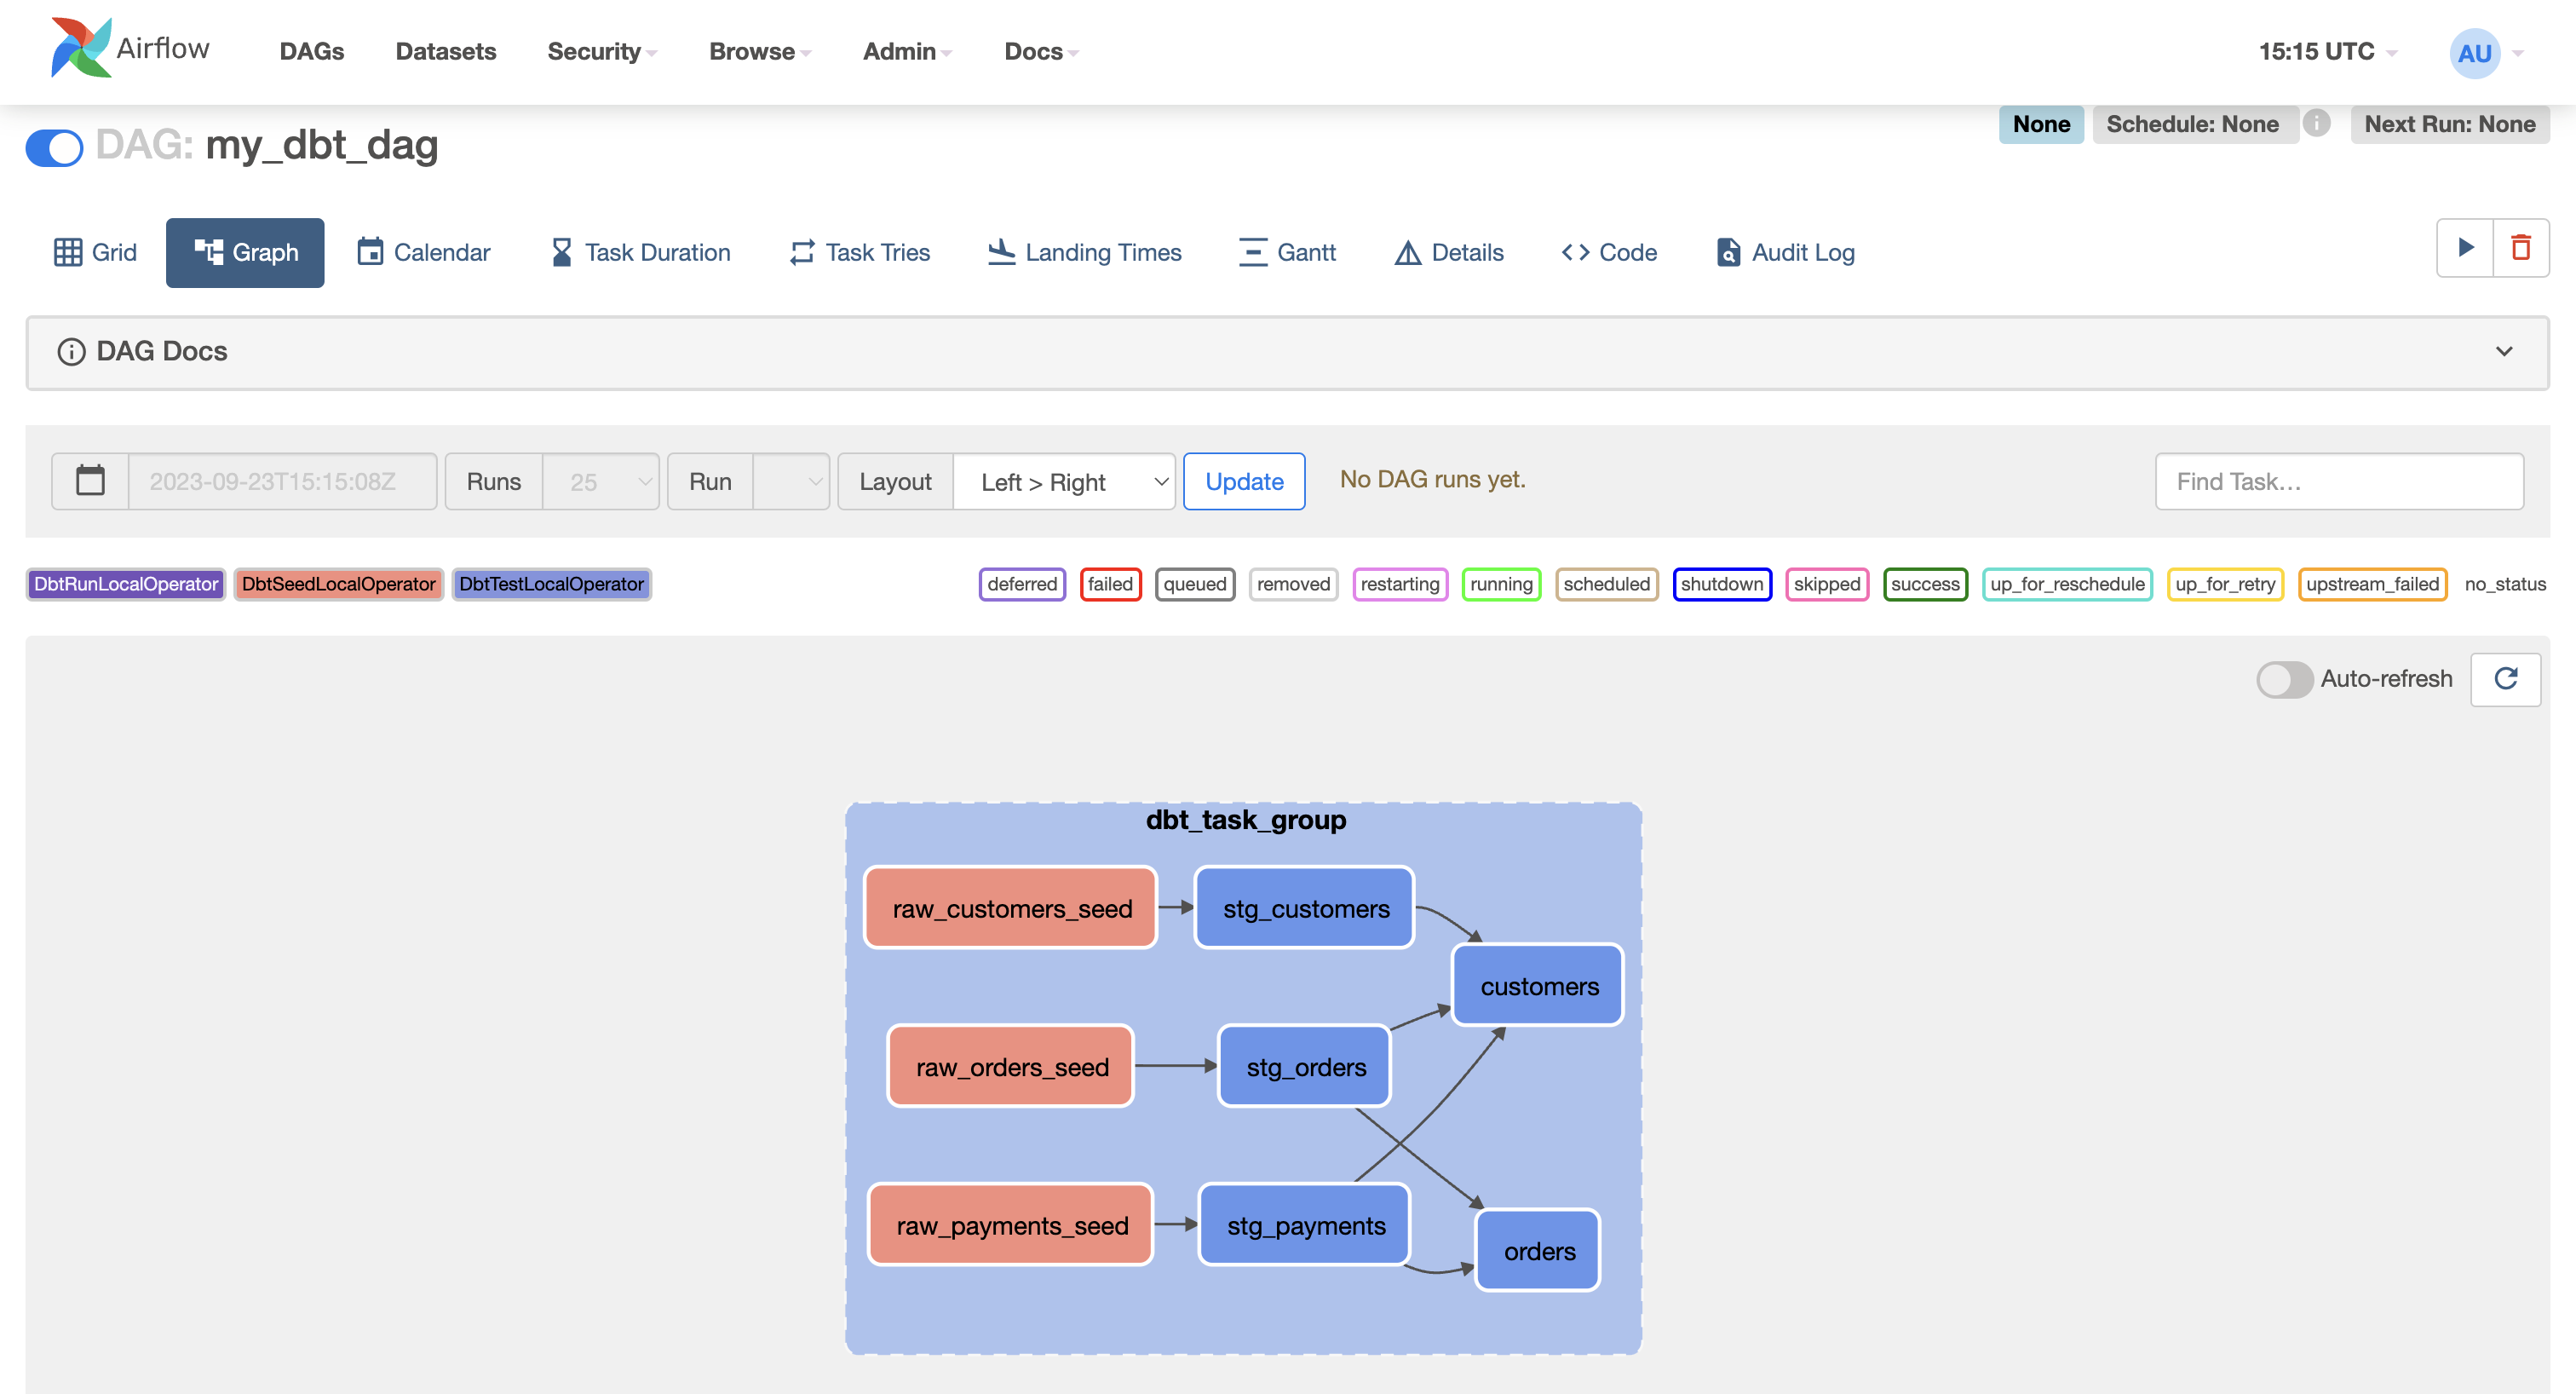
DISCLAIMER: before running the DAG we’ll need to create a connection to our postgres database.
Step 7 - Add a connection to Postgres
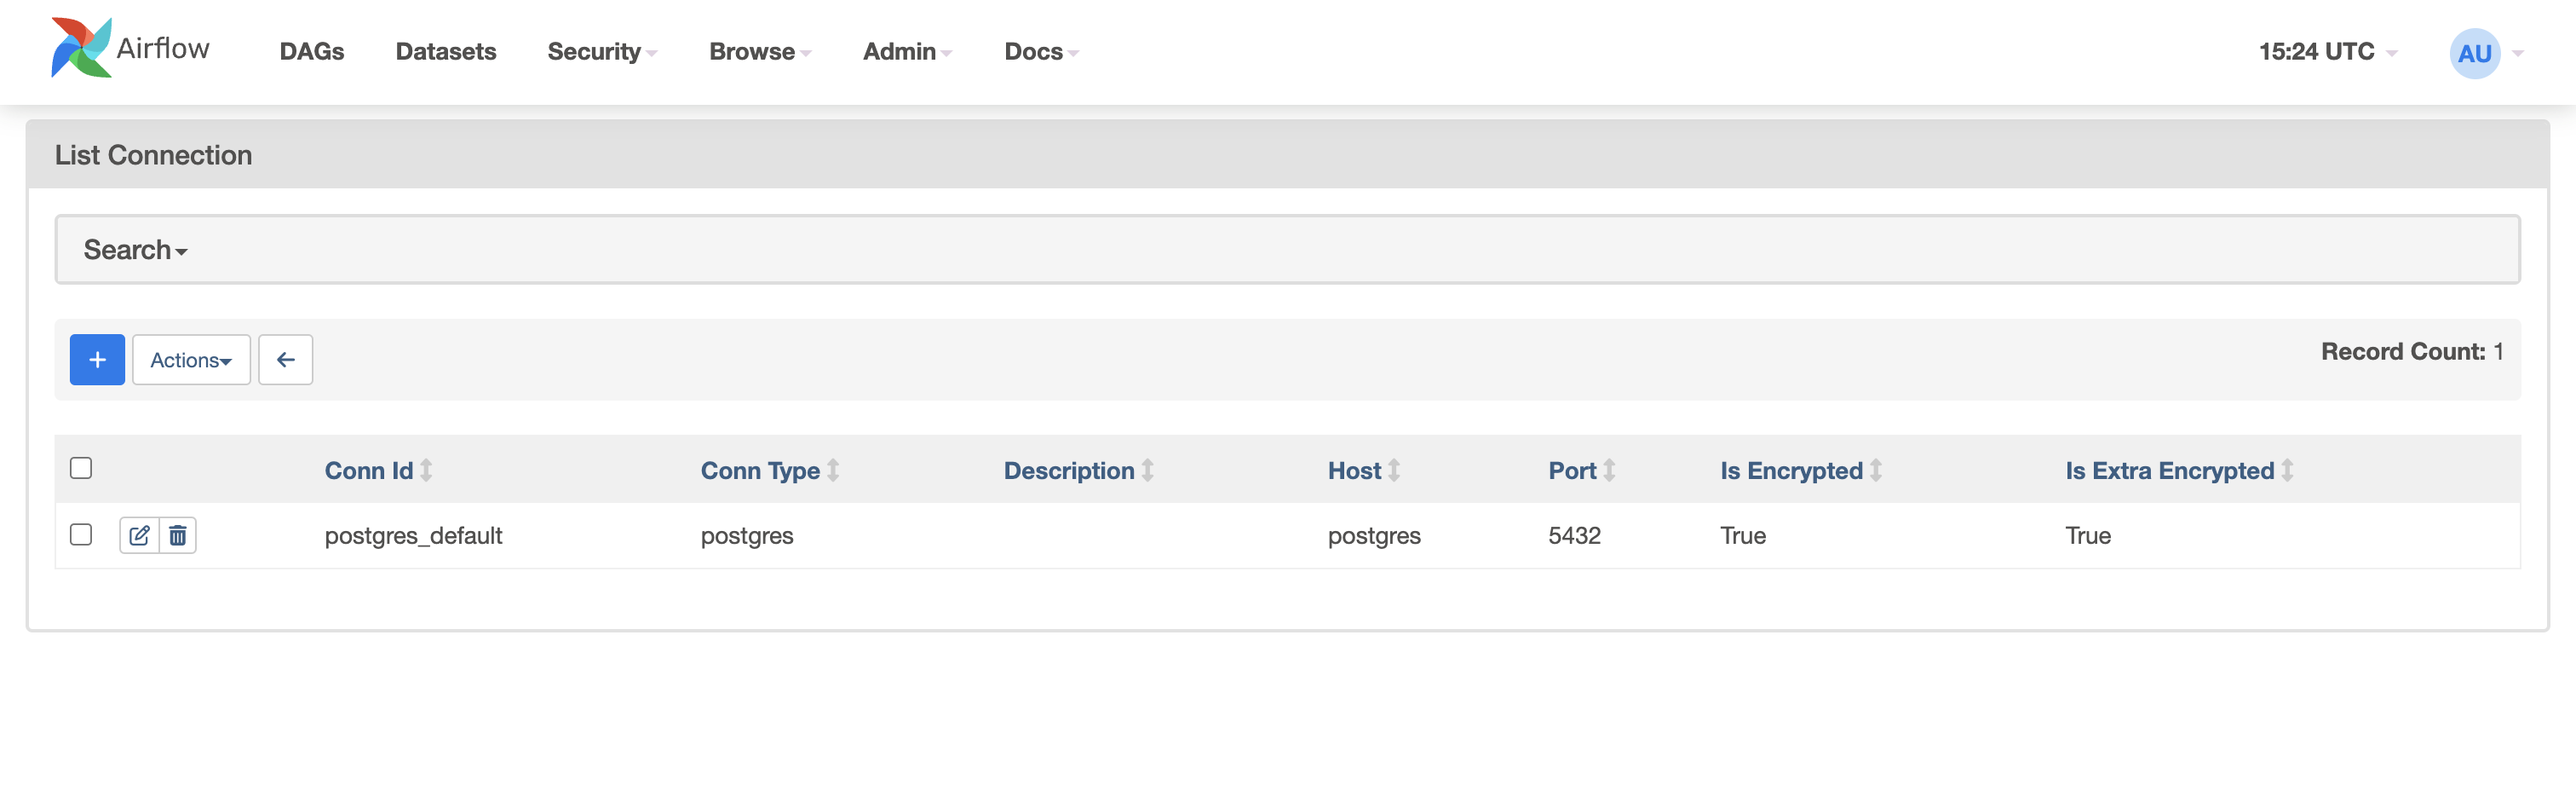
Our DbtTaskGroup is expecting a connection called postgres_default. So, let’s create that by navigating to Admin >> Connections in the Airflow UI. There should be an example connection called postgres_default already preloaded that you can modify (if not, then create a new connection and name it postgres_default).
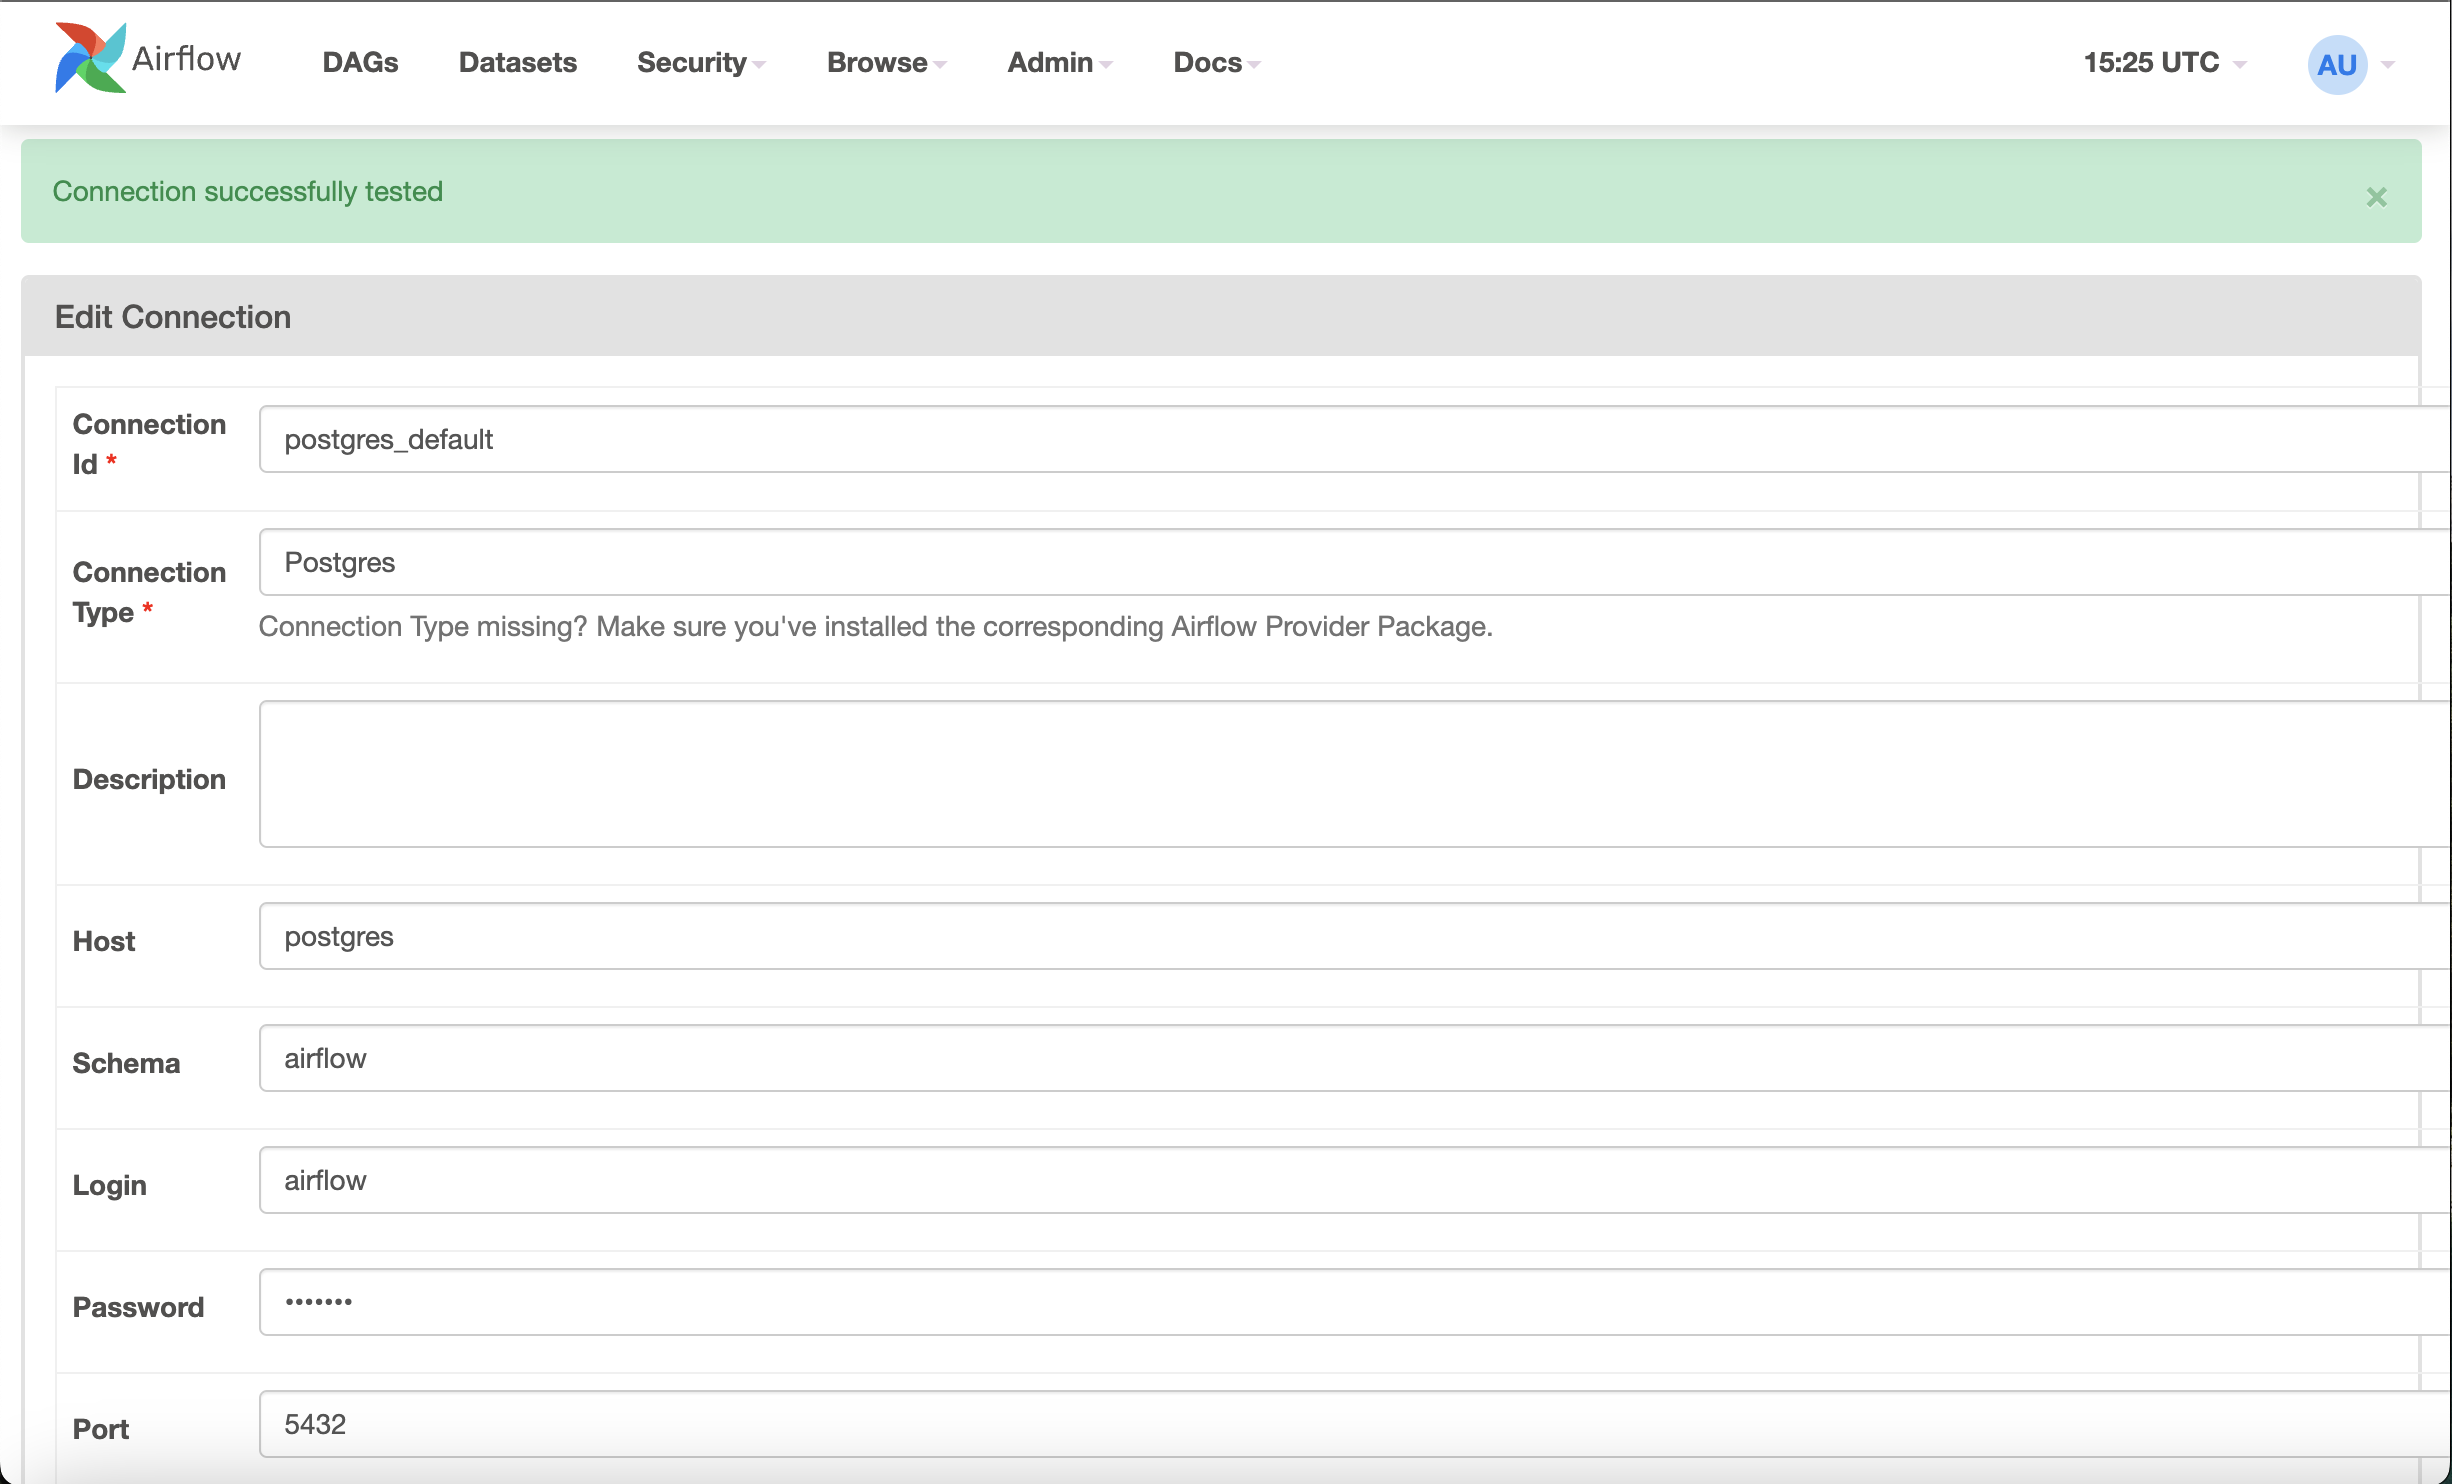
We will use our local Airflow’s metadatabase running in Docker. To do so, here are the default values that you’ll want to enter:
- Connection Id:
postgres_default
- Connection Type:
Postgres
- Host:
postgres
- Schema:
airflow
- Login:
airflow
- Password:
airflow
- Port:
5432
Click the Test button at the bottom to get the success banner at the top of your connection page.
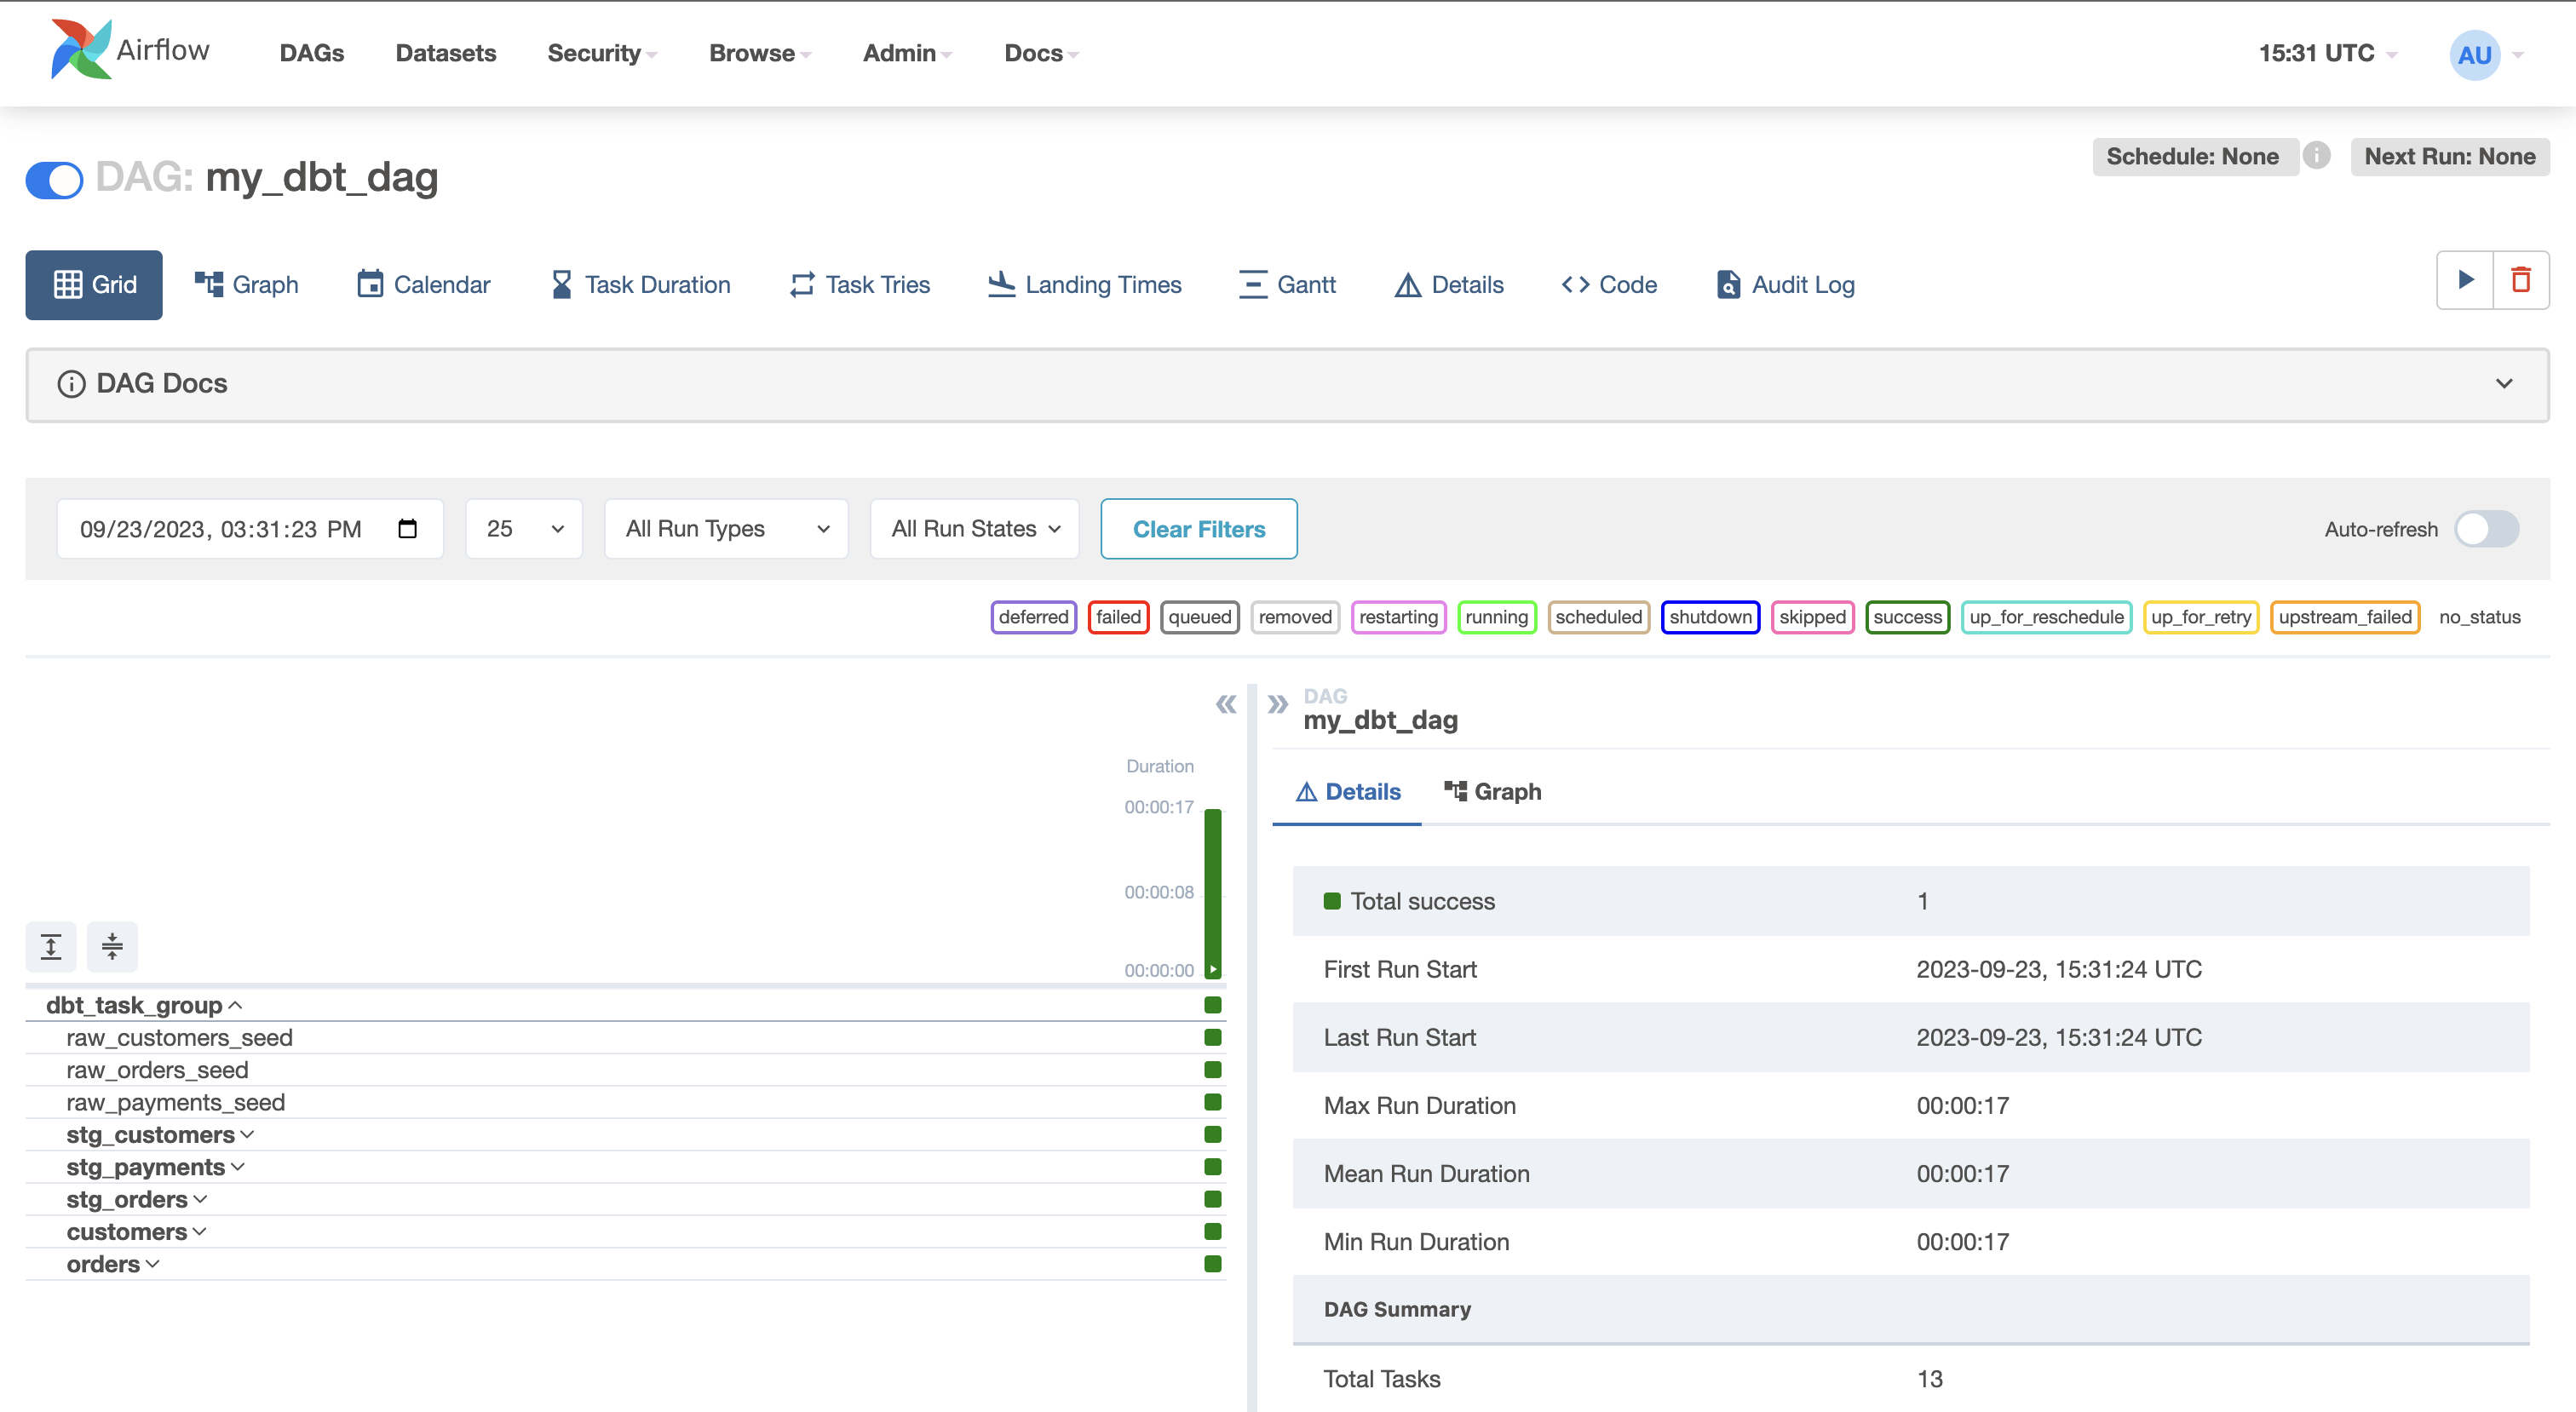
Step 8 - Run the DAG
Now that you created the connection, you can run your DAG! Trigger the my_dbt_dag and enjoy (hopefully 🤞) all of the dark green success squares in the DAG’s grid view.
Viewing the Results in Postgres
So the DAG ran! Let’s see what happened in the database. If you were to view the results in the Postgres database, you’d see the following tables & views had been built as part of the dbt Jaffle Shop project:
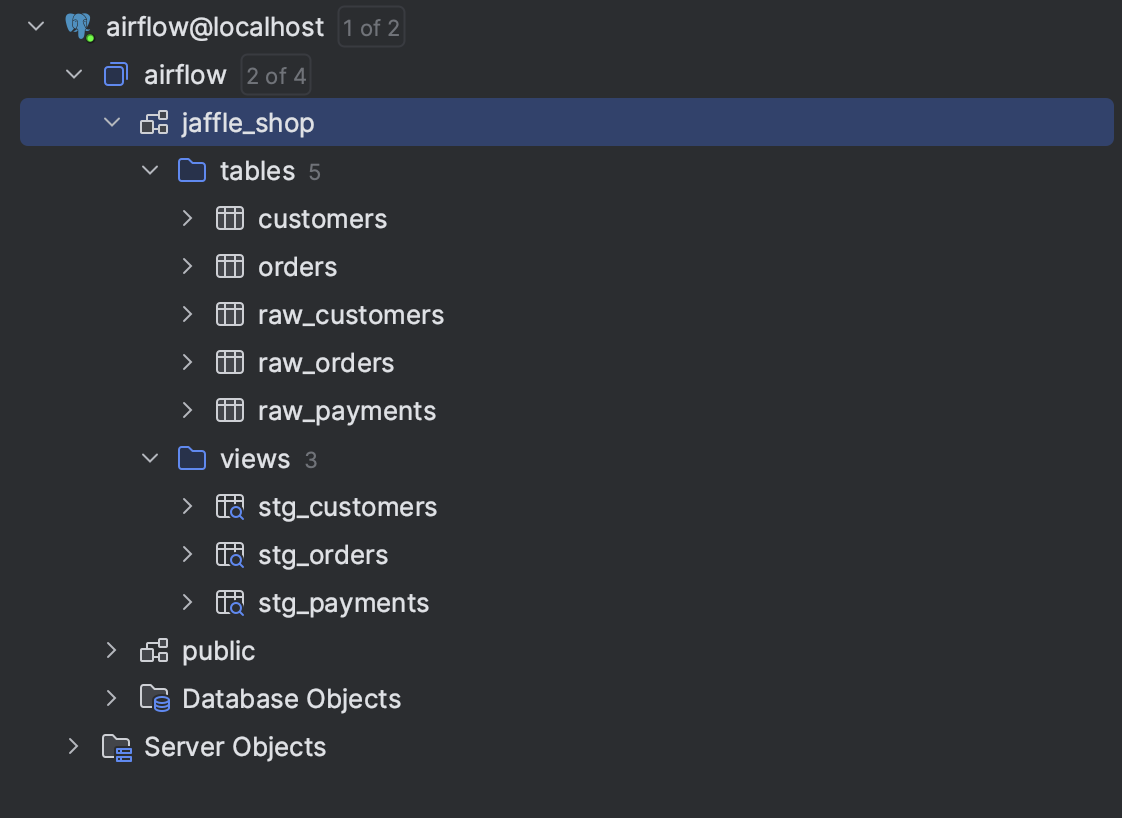
For a better understanding of the models generated by Jaffle Shop, be sure to checkout dbt’s documentation here.
Conclusion
In conclusion, Astronomer Cosmos has bridged the gap between dbt core and Apache Airflow, offering an innovative solution for orchestrating data transformations. Following the steps outlined in this guide, you’ve unlocked the potential to integrate dbt core into your MWAA workflows seamlessly. The ability to run Cosmos on MWAA provides cost savings and greater flexibility and control over your data pipelines. Whether you’re a seasoned data engineer or just starting your journey, Cosmos simplifies the process, allowing you to focus on what matters most—delivering valuable insights from your data. We hope this blog post has been an invaluable resource on your path to mastering data orchestration with Astronomer Cosmos and MWAA. Happy data engineering!


